Technically, it is possible to program your own keymap if the EC firmware is source, as it's case for my laptop (open sourcing of the firmware), or if you have a custom keyboard.
You can achieve better results using a software solution such as Kmonad, allowing an unlimited number of layers and macros.
Firmware-level customization: Framework Laptop/Chromebooks
Some Framework community members have already managed to interact directly with the embedded chip to change the key codes. You can use the same trick on Chromebooks, but you have to figure out the key matrix.
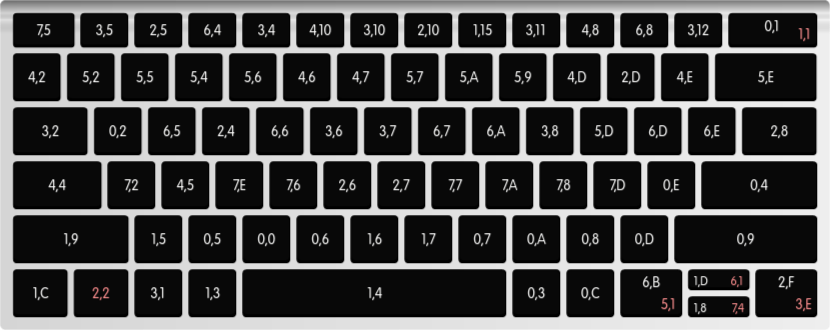
The logic is as follows: each key has its own coordinates (in the key matrix) and the EC translates them to scan codes. You can find the key matrix for the framework laptop here. I've re-created it below using keyboad-layout-editor.com.
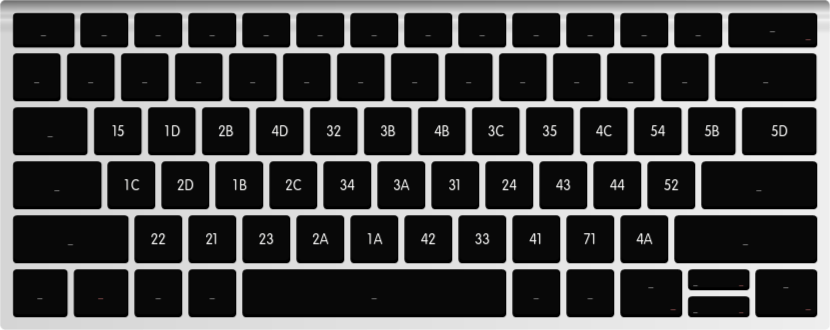
What is the scan code for "A" key?: 1C, and you can find the rest of the scan codes here.
If we want to map the key (6,5) to A (W in QWERTY layout), you'd run the following command:
ectool --interface=fwk raw 0x3E0C d1,d1,b6,b5,w1c # W > A
3E0C is the command for updating the key matrix. You can find more: The Framework Laptop's Embedded Controller (EC) :: HowettNET.
These changes would persist for ~10min after shutdown. So consider setting up a script that is executed automatically after each boot.
To manage this process properly, I used a json file that maps the needed keys to their scan codes (key2code.json) and another that represents my keymap (coord2key.json). Then I created create_script.py that generates the script of ectool commands.
The script maps the matrix coordinates to the desired scan code. All these assets are expected to be in the same folder.
#!/usr/bin/python
# create_script.py

import json

script = ['#!/bin/bash']
command = '/usr/sbin/ectool --interface=fwk raw 0x3E0C'
# coord2key contains:
#   "0,2":"q",
#   "6,5":"w",
#   "2,4":"f",
coord2key = json.load(open("coord2key.json","r"))
# key2code contains:
#   "f2":"06",
#   "f3":"04",
#   "f4":"0c",
key2code = json.load(open("key2code.json","r"))

for coord, k in coord2key.items():
    row, col = coord.split(',')
    code = key2code[k.lower()]
    script.append(f'{command} d1,d1,b{row},b{col},w{code}'.lower())

with open("change_layout.sh","w") as f:
    f.write("\n".join(script))
    f.close()
The new keymap (blank for unchanged),

The same keymap represented using the scan codes.
You can then schedule the script to run automatically during the boot step.
In OpenRC, rename the generated change_layout.sh to 00_change_layout.start, chmod +x it and add it to /etc/local.d/. This requires the local service to be enabled.
Software customization
The firmware approach is not always possible and has its limitation. I use it as a first customization step. The second (software) step is to use Kmonad, which offers endless possibilities.
I've used it on Linux and Windows without any runtime issues. The setup can be intimadating at first, but you just have to start and the rest should go smoothly.
- Start by installing Kmonad: https://github.com/kmonad/kmonad.
You might need to get some dependencies for Xorg to manipulate the input devices. For instance, the User level driver support should be enabled in the kernel (uinput module)
- In the repo's
keymapfolder you can start fromtutorial.kbd.
I'll go through a minimal keymap file here. First, find the path to your keyboard device.
Mine is /dev/input/by-path/platform-i8042-serio-0-event-kbd. Let's define the keyboard config:
(defcfg
  ;; For Linux
  input  (device-file "/dev/input/by-path/platform-i8042-serio-0-event-kbd")
  output (uinput-sink "KMonad Keyboard")
  cmp-seq ralt    ;; Set the compose key to `RightAlt'
  cmp-seq-delay 5 ;; 5ms delay between each compose-key sequence press

  ;; Comment this if you want unhandled events not to be emitted
  fallthrough true

  ;; Set this to false to disable any command-execution in KMonad
  allow-cmd true
)
Now we need to define our source layer, which should represent our input keyboard. It doesn't have to match all key in the keyboard. Its goal is to define the keys that should be channeled through the Kmonad sink.
I'm using the layout injected to the firmware:
(defsrc
  grv  1    2    3    4    5    6    7    8    9    0    -    =    bspc
  tab  q    w    f    p    b    j    l    u    y    ;    [    ]    \
  caps a    r    s    t    g    m    n    e    i    o    '    ret
  lsft x    c    d    v    z    k    h    ,    .    /    rsft
  lctl lmet lalt           spc            ralt rmet cmp  rctl
)
For Kmonad to work, we need at least one deflayer. The colemak layer will be our base layer.
My secondary layer is the digits layer (make sure to handle the parentheses and underscore properly). We also need to define aliases to switch between the two
(defalias
    col  (layer-switch colemak) ;; switch to the base layer
    lcol (cmd-button "echo colmk > /etc/kmonad/status") ;; echo colmk to status file
    scol (tap-macro @lcol @col) ;; switch and log colemak
    dig  (layer-switch digits) ;; switch the digits layer
    ldig (cmd-button "echo digit > /etc/kmonad/status") ;; echo digit to status file
    tdig (layer-toggle digits) ;; digits is active while the button is pressed
    sdig (tap-macro @ldig @dig) ;; echo and switch to digits
    ssdg (tap-next @sdig (layer-toggle digits))
)
Aliases are basically custom keys. @col/@dig (Caps) will switch between the layers, while the digits layer would be active as long as @tdig is pressed (Right Alt)
I've created @lcol (log colemak) as a hack to echo the layer name to /etc/kmonad/status, which can be used to display the current layer using other tools (i3, polybar...). Now, using tap macro, I can assign a key to tap @lcol @col.
With @ssdg I can use the digits layer while holding the Caps key, but it will behave as @sdig when tapped.
Kmonad offers numerous features and I recommend going through the tutorial file (see above) for an extensive guide. It's quite intuitive and only your creativity is the limit.
(deflayer colemak
  grv  1    2    3    4    5    6    7    8    9    0    -    =    bspc
  tab  q    w    f    p    b    j    l    u    y    ;    [    ]    \
@ssdg  a    r    s    t    g    m    n    e    i    o    '    ret
  lsft x    c    d    v    z    k    h    ,    .    /    rsft
  lctl lmet lalt         @sspc           @tdig rmet cmp  rctl
)

(deflayer digits
  grv  1    2    3    4    5    6    7    8    9    0    -    =    bspc
  tab  1    2    3    4    5    6    7    8    9    0    [    ]    \
 @scol ~    {    [    \(   -    \_   \)   ]    }    `    +    ret
  lsft @    #    #    $    !    \    &    *    |    =    rsft
  lctl lmet lalt           spc            ralt rmet cmp  rctl
)
Now we're all set with our basic config keymap.kbd. I've placed it in /etc/kmonad/.
# test the service in debug mode
kmonad -l debug /etc/kmonad/keymap.kbd
We can also create our own kmonad service that starts at boot time. Simply add the following file /etc/init.d/kmonad then activate the service rc-update add kmonad boot.
#!/sbin/openrc-run
# 2023, Ayoub Ghriss
# Distributed under the terms of the GNU General Public License v2
# You don't want to use the local.d trick for this part
# local.d scripts require commands that terminate. Kmonad has to stay running in
# the background

name="kmonad daemon"
description="Apply kmonad layout"
command=/usr/bin/kmonad
command_args="/etc/kmonad/keymap.kbd"
command_background=true
pidfile="/run/${RC_SVCNAME}.pid"
depend() {
        after *
}
Bonus
Or in case you use systemd and systemctl enable kmonad
# /etc/systemd/system/kmonad.service
[Unit]
Description=kmonad keyboard config

[Service]
Restart=always
RestartSec=3
ExecStart=/usr/bin/kmonad /etc/kmonad/keymap.kbd
Nice=-20

[Install]
WantedBy=default.target
Polybar integration
If needed:
[module/kmonad]
type = custom/script
exec = cat /etc/kmonad/status
exec-if = pgrep -x kmonad
interval = 0
format-prefix-foreground = #5b